
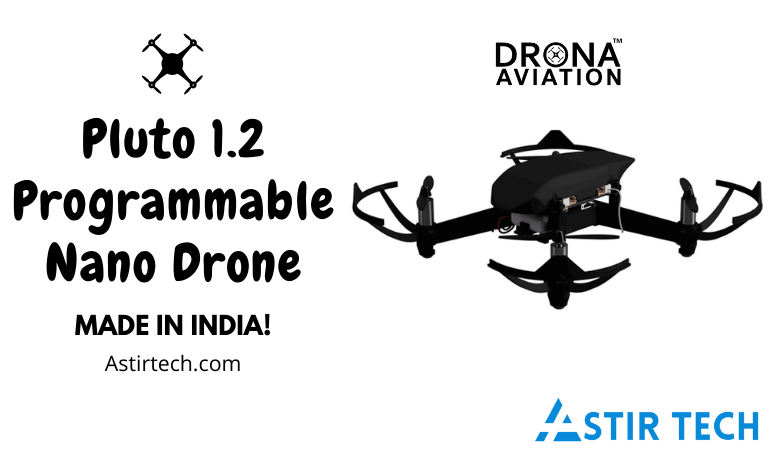
Drones are getting very popular in India these days. As the new drone laws of 2021 have made getting a drone easier, the market is getting flooded with toys and professional drones. Another field of drones are getting more attention these days and that is Programmable drones for STEM education. Drona Aviation is one of the pioneers in drone development in India. Pluto 1.2 is one of their products for students and hobbyists.
In this article, I will be covering what pluto is, what we get in the box, how to assemble our drone and finally my review of Pluto 1.2. So without wasting any more time, let’s get right into it.
What is Pluto 1.2?
Pluto 1.2 is a programmable nano drone kit developed by Drona Aviation. What makes it different from other toy drones is its modularity and programmability. It’s more than just a toy, Pluto 1.2 is a tool for students and hobbyists alike.
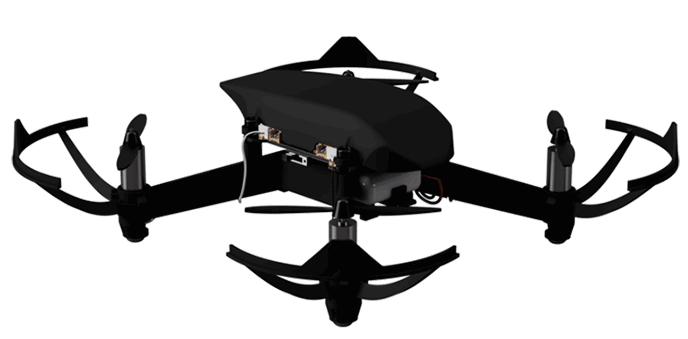
Pluto 1.2 is powered by the Primus V4 flight controller which is a slightly downgraded version of Primus X. Primus is a reprogrammable flight controller which comes with onboard WiFi. pluto comes with a DIY kit that you can assemble and fly using the controller app or program it to fly with your imagination.
Pluto 1.2 Specfications.
- Size – 16 x 16 Cms
- Weight – 54g
- Payload Capacity – 15g
- Max Range – 80m
- Flight Time – 8+ Mins
- Charging Time – 45 Mins
- Speed – 3m/sec
- Flight Controller – Primus V4
- Stabilization – 10-axis stability
- Firmware – Magis
- Connectivity – Wi-Fi
- Controls – Smartphone App or External Gamepad (not included in the box)
Now that we are familiar with Pluto, Let’s see what we get in the box and how to assemble our drone.
Unboxing the Kit.

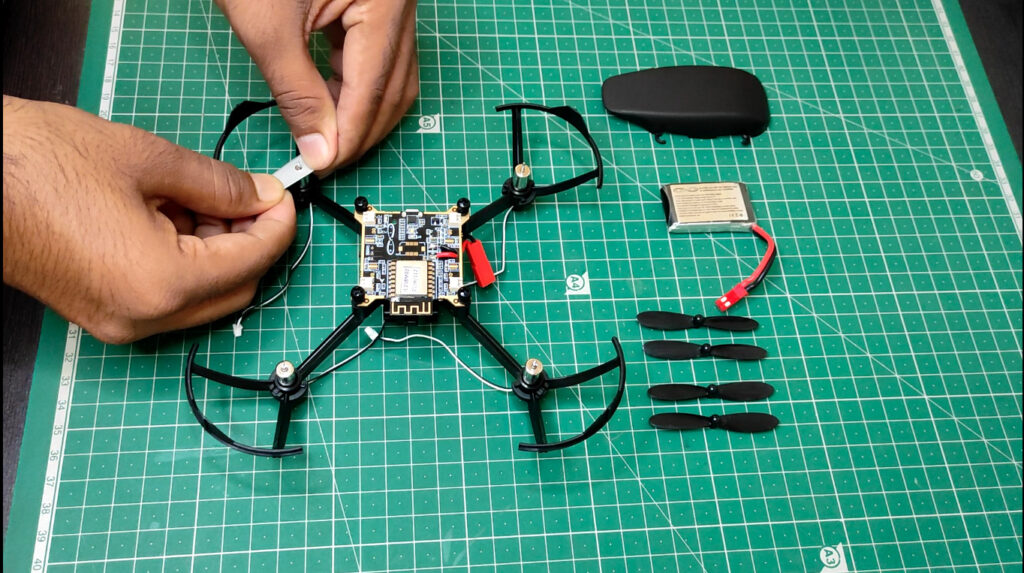
Here is a list of all the boxes contains.
- Primus V4 Flight Controller
- 4 x Coreless Motors
- 8 x Propellers (4 Extra)
- 1 x Battery 3.7V 600mAh
- 4 x Plastic Screws
- 4 x Dampers
- 6 x Propeller guard (2 Extra)
- 1 x Propeller removel tool
- Frame and canopy
- Flat head Screw driver
Along with the above-mentioned components, the box also has a few stickers, a rookie pilot badge and a well descriptive user manual. You can get yourself a Pluto 1.2 nano drone kit from Amazon or Drona Aviation.
Now that we know what we are getting in the box, let us put it all together and make our very first drone.
Assembling Pluto 1.2 Drone.
Before we start with the assembly here are some things you need to be cautious about.
- Do not touch the Primus V4 board without being properly grounded. As these electronic components are sensitive to static, It can damage the board. Use an anti-static band or mat if you have that or just make sure your feet are touching the floor directly while handeling the board.
- Do not lose the rubber dampers. these are small rubber things looking like doughnuts. We only get 4 and they are very essential for the drone.
- The kit comes with a 3.7V Li-Po battery, these are powerful but very sensitive battries. Do not expose it to fire, do not short the leads and do not attempt to remove its wrapper. Read the manual for more information about keeping the battry safe.
Now as we have gotten that out of our way, let’s start assembling our Pluto 1.2.
1. Attach the rubber dampers on the Primus V4 Board.

Insert the rubber dampers into the mounting section of the Primus board as shown in the image above. These are very important for the proper functioning of the drone. They dampen the vibrations caused by motors, these vibrations if not treated can cause a malfunction in the sensors compromising the drone’s stability.
2. Attaching the Primus V4 to the frame.

Place the Primus V4 board on the frame of Pluto. Notice the arrow on the frame and on the Primus board. Make sure you match these arrows so they face the same direction. That is the front side of our drone. Next, align the mounting holes properly.

Now fasten the board and frame with the plastic screws provided. Be gentle and slow as It takes some time for the screws to pass through the rubber. Do not tighten them all the way, leave the screws as shown in the image above. we need it for attaching the canopy later.
3. Attaching the Motors.

Attach the motors into the motor mounts as shown in the image above. Remember to first pass the wire through the hole at the bottom of the mount. The motors are a tight fit so you may have to apply some force. Though, be gentle with the frame. Attach all 4 motors in a similar way.
Now place the drone on a flat surface and use the propeller remover tool to press the motors into the mount. Do not apply too much force, just enough to know that the motors are firmly inserted into the mounts.
Next, we have to connect the motors to the Primus board. This is very easy as we have micro JST connectors to plug in 4 motors.

Loop the wires through the frame to hide them and make the drone look clean. Then attach the connector to the socket as shown in the image above. Do not apply force. The connectors only fit in one way.

After attaching all the connectors, you can tuck the wire into the groove in the bottom of each arm of the frame. This will make the drone look even slicker.
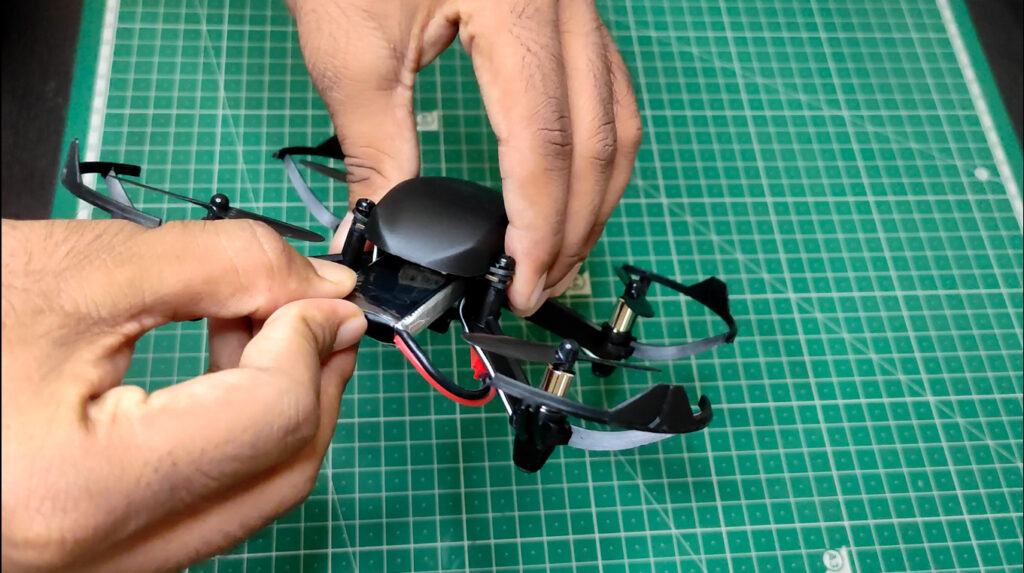
4. Attaching the Canopy, Propellers, and Battery.

Now we can attach the canopy on the top as shown in the image above. The canopy has 4 semi-circular mounts which we need to attach between the mounting screws and the dampeners. Once all 4 sides are attached, we can tighten the screws fully to secure our drone frame.

Now to attach propellers, we first need to understand that there are 2 sets of propellers set ‘A’ and set ‘B’.
Refer to the image given above, Because of the diagonal attachment of the propellers the drone gets stability.
Double-check that the attachment is correct as it is very essential.
Now attach the battery plug into the connector of the Primus board. These connectors also work only in one way so it should not be difficult. The wire colours should match. Next, slide the battery into the frame from the front carefully. Once all the way in, the battery should fit in perfectly into the space without popping out.
With that been done, our Pluto 1.2 is fully assembled and ready to take off. But before that, do charge the drone fully using a micro USB.

How to fly Pluto 1.2?
With a fully assembled drone now all that remains is a flight test. Now you may ask “Where is the controller?”. So as we have seen there is no remote controller in the box, that is because Pluto uses WiFi connectivity to be controlled over a smartphone app.

The Pluto Smart Controller app is available for both Android and iOS. Just download the app and follow the instructions. Here I will be using the Android app but the setup is the same with iOS.
After installing the app we are greeted with a screen to make our pilot profile. Here will add a name and a profile picture. I have also selected the “I am a developer” option as I will be tinkering with the code in the future.

After filling in the information, click on “Let’s Fly”. Now the app will go through a tutorial explaining all the functions.
I recommend you to go through the guide as it provides vital information.
Now we have to connect our Pluto drone to the app through WiFi. For this, Pluto generates a WiFi hotspot to which we need to connect our smartphone. But then you will notice that the WiFi has a lock and you don’t have the password, that is because we need to get our password through Drona Aviation’s website. To do that, follow the steps given below.
1. Head over to the website and create an account if you haven’t already. Then click on the “Get your drone password” button.

2. Then we get a new window as given below. Here enter the SSID and Auth key. You can find it inside of your box, under side of the lid. On the same envelope where the manual is placed.
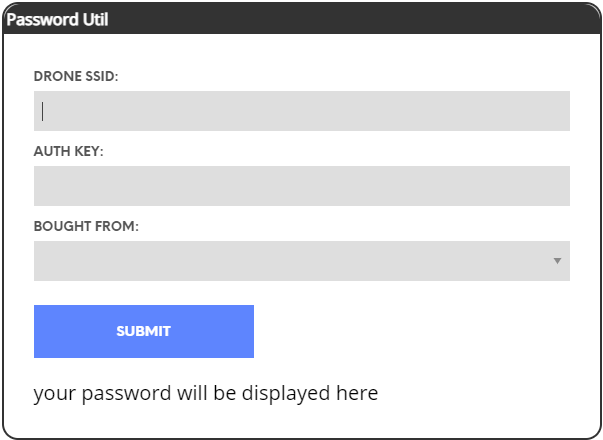
Once the correct information is submitted, the password will be displayed under the “Submit” button.
Now turn on the drone and connect to it through WiFi. once the connection is established we can move forward.
Calibrating the drone.
Now it is very important to calibrate the drone before using it. Don’t worry though, it is a very simple process.
1. Open the app and click on ‘connect’. This will connect the app to the drone. Now on the top left corner, there is Menu. Click on Menu >> Drone Settings, this will open a settings page where the first option is to calibrate the Accelerometer.

Place the drone on a flat surface and hit the Calibration button. It will take a few seconds for the drone to calibrate.
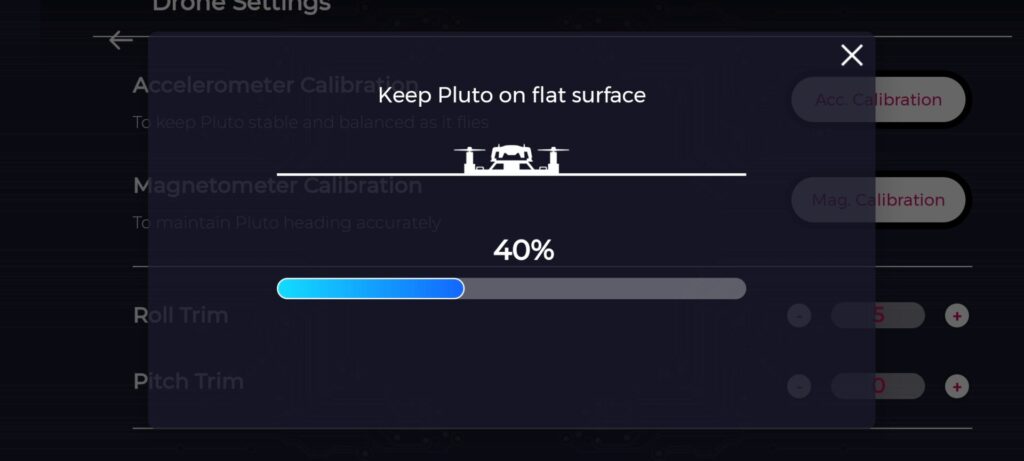
2. Now we have to calibrate the magnetometer. For doing this we first need to understand the axis of the drone. There are three: Pitch, yaw, and roll. Refer to the diagram on page no. 17 of the user manual. All we have to do is click on the calibration button and follow the instructions from the app.

After all the calibration, we can finally take our first flight. Just place the drone on a flat surface and click on “Arm”. Make sure the surrounding is clear and hit “Take Off”.

Pluto 1.2 Drone Review.
I have been using Pluto 1.2 for a couple of days now, here is what I have to say about the drone.
This review is based on my experience of flying Pluto for 2 days in both indoor and outdoor conditions.
Overall the package provides a great experience for students and hobbyists to create and fly their first drone. Here is the list of all the pros and cons of Pluto 1.2.
Pros of Pluto 1.2 drone:
- Easy to assemble: The Drone was fairly easy to assemble, all the necessary instructions are present in the manual with pictures. Took me less than an hour to build, it will be a great tool for kids to learn how to build stuff.
- Simple and robust design: The drone is small, light weight and looks beatiful. But It is also very robust. During my flight tests I did crash it a bit as I was learning and it took the abuse like very will. No damages at all apart from a few minor scratches on the propeller guard.
- Easy to fly: Consdring I have never flown a drone before, Pluto was fairly easy to calibrate and fly. The controlling was good and responsive.
- Modularity: One of the best features of this drone is it’s ability to be modified. Adding sensors and modules to make projects and do experiments makes this a perfect educational kit.
- Re-Programmability: Expanding on Pluto’s modularity, this aspect of the drone makes it possible for users write program and upload it wirelessly.
Along with all these pros, the price of Pluto 1.2 makes a huge impact as most programmable drones in the market are quite expensive. Coming in at just ₹6799 or $92.38 Pluto is the cheapest programmable drone on the market as of now.
But there are some cons that I noticed, let’s see below.
Cons of Pluto 1.2 drone:
- Canopy: The very first thing I noticed after powering on the drone was that the canopy was covering up the endicator LEDs. Not a huge deal breaker but I would prefer a translucent canopy so the lights shine through.
- Drifting Issue: This is a very common issue in toy drones. Even after calibrating Pluto 1.2, it tend to drift slightly not being able to hover stably. After I was unable to resolve this on my own so I reached out to Drona Aviation Team. They acknowledged the issue and said they are working on resolvoing it.
Apart from these, I did not find any major issues with Pluto 1.2. It is a great tool for tinkerers and makers.
Get one for yourself or your kids from Amazon IN or Drona Aviation (Get 5% OFF on Pre-order).
If you like this article, do subscribe for more. Also, check out our article on ClicBot a modular robot for STEM education.
4 thoughts on “Pluto 1.2 Programmable Nano Drone.”